Nginx安装 首先在Nginx官网 下载稳定版本的Nginx安装包,并将安装包上传到Linux。tar -zxvf nginx-1.16.0.tar.gz 将压缩包解压。
接下来先安装Nginx所需的依赖:
gccyum install gcc-c++
PCREyum install -y pcre pcre-devel
zlibyum install -y zlib zlib-devel
opensslyum install -y openssl openssl-devel
然后进入刚刚解压的文件夹,执行以下命令:
1
2
3
4
5
6
7
8
9
10
11
12
[root@localhost nginx-1.16.0]# ./configure \ > --prefix=/usr/local/nginx \ > --pid-path=/var/run/nginx/nginx.pid \ > --lock-path=/var/lock/nginx.lock \ > --error-log-path=/var/log/nginx/error.log \ > --http-log-path=/var/log/nginx/access.log \ > --with-http_gzip_static_module \ > --http-client-body-temp-path=/var/temp/nginx/client \ > --http-proxy-temp-path=/var/temp/nginx/proxy \ > --http-fastcgi-temp-path=/var/temp/nginx/fastcgi \ > --http-uwsgi-temp-path=/var/temp/nginx/uwsgi \ > --http-scgi-temp-path=/var/temp/nginx/scgi
可以看到文件夹下多出一个Makefile,然后依次执行make指令和make install指令:
1
2
[root@localhost ~]# make [root@localhost ~]# make install
在启动Nginx之前,先创建临时文件夹:
1
2
[root@localhost ~]# mkdir /var/temp [root@localhost ~]# mkdir /var/temp/nginx
启动Nginx 进入Nginx的安装目录:/usr/local/nginx,可以看到有conf、sbin、html三个文件夹,其中sbin中存放着的就是Nginx的可执行文件:
1
2
3
[root@localhost ~]# cd /usr/local/nginx [root@localhost ~]# cd sbin [root@localhost ~]# ./nginx
停止Nginx
快速停止:查找到Nginx的进程id然后使用kill命令强制杀死进程。
1
2
[root@localhost ~]# cd /usr/local/nginx/sbin [root@localhost ~]# ./nginx -s stop
完整停止:等待Nginx进程处理完任务再进行停止。
1
2
[root@localhost ~]# cd /usr/local/nginx/sbin [root@localhost ~]# ./nginx -s quit
重启Nginx
先停止再启动
1
2
3
[root@localhost ~]# cd /usr/local/nginx/sbin [root@localhost ~]# ./nginx -s quit [root@localhost ~]# ./nginx
重新加载配置文件
1
2
[root@localhost ~]# cd /usr/local/nginx/sbin [root@localhost ~]# ./nginx -s reload
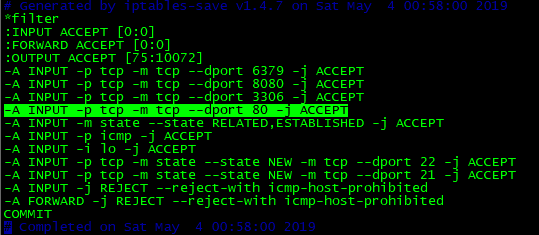
测试Nginx Nginx的默认端口是80,需要在iptables中将80端口设为开放,打开iptables文件并加入以下信息:[root@localhost nginx]# vim /etc/sysconfig/iptables-A INPUT -p tcp -m tcp --dport 80 -j ACCEPT[root@localhost ~]# service iptables restart
然后在主机浏览器通过ip+端口访问Nginx,比如:192.168.94.192:80,看到如下信息,说明Nginx配置成功:
设置Nginx开机自启动 这里使用编写shell脚本的方式设置:[root@localhost ~]# vim /etc/init.d/nginx
1
2
3
4
5
6
7
8
9
10
11
12
13
14
15
16
17
18
19
20
21
22
23
24
25
26
27
28
29
30
31
32
33
34
35
36
37
38
39
40
41
42
43
44
45
46
47
48
49
50
51
52
53
54
55
56
57
58
59
60
61
62
63
64
65
66
67
68
69
70
71
72
73
74
# !/bin/bash # nginx Startup script for the Nginx HTTP Server # it is v.0.0.2 version. # chkconfig: - 85 15 # description: Nginx is a high-performance web and proxy server. # It has a lot of features, but it's not for everyone. # processname: nginx # pidfile: /var/run/nginx.pid # config: /usr/local/nginx/conf/nginx.conf nginxd=/usr/local/nginx/sbin/nginx nginx_config=/usr/local/nginx/conf/nginx.conf nginx_pid=/var/run/nginx.pid RETVAL=0 prog="nginx" # Source function library. . /etc/rc.d/init.d/functions # Source networking configuration. . /etc/sysconfig/network # Check that networking is up. [ ${NETWORKING} = "no" ] && exit 0 [ -x $nginxd ] || exit 0 # Start nginx daemons functions. start() { if [ -e $nginx_pid ];then echo "nginx already running...." exit 1 fi echo -n $"Starting $prog: " daemon $nginxd -c ${nginx_config} RETVAL=$? echo [ $RETVAL = 0 ] && touch /var/lock/subsys/nginx return $RETVAL } # Stop nginx daemons functions. stop() { echo -n $"Stopping $prog: " killproc $nginxd RETVAL=$? echo [ $RETVAL = 0 ] && rm -f /var/lock/subsys/nginx /var/run/nginx.pid } # reload nginx service functions. reload() { echo -n $"Reloading $prog: " #kill -HUP `cat ${nginx_pid}` killproc $nginxd -HUP RETVAL=$? echo } # See how we were called. case "$1" in start) start ;; stop) stop ;; reload) reload ;; restart) stop start ;; status) status $prog RETVAL=$? ;; *) echo $"Usage: $prog {start|stop|restart|reload|status|help}" exit 1 esac exit $RETVAL
保存并退出。
设置文件的访问权限:chmod a+x /etc/init.d/nginx (a+x ==> all user can execute 所有用户可执行)
加入到rc.local中:[root@localhost ~]# vim /etc/rc.local/etc/init.d/nginx start,下次重启会生效。
ftp配置 安装vsftpd组件 [root@localhost ~]# yum -y install vsftpd
添加一个ftp用户 此用户就是用来登录ftp服务器用的。[root@localhost ~]# useradd ftpuser[root@localhost ~]# passwd ftpuser
开启21端口 因为ftp默认的端口为21,而centos默认是没有开启的,所以要修改iptables文件[root@localhost ~]# vim /etc/sysconfig/iptables[root@localhost ~]# service iptables restart
修改selinux 执行以下命令查看状态:
1
2
3
4
5
6
7
8
9
10
[root@localhost ~] allow_ftpd_anon_write --> off allow_ftpd_full_access --> off allow_ftpd_use_cifs --> off allow_ftpd_use_nfs --> off ftp_home_dir --> off ftpd_connect_db --> off ftpd_use_passive_mode --> off httpd_enable_ftp_server --> off tftp_anon_write --> off
执行上面命令,返回的结果中allow_ftpd_full_access和ftp_home_dir都是off,代表没有开启外网的访问[root@localhost ~]# setsebool -P allow_ftpd_full_access on[root@localhost ~]# setsebool -P ftp_home_dir on
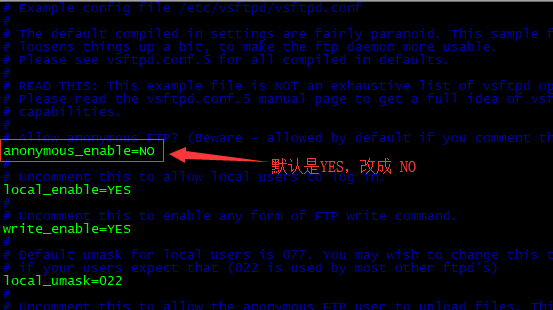
关闭匿名访问 [root@localhost ~]# vim /etc/vsftpd/vsftpd.conf
设置开机自启 [root@localhost ~]# chkconfig vsftpd on
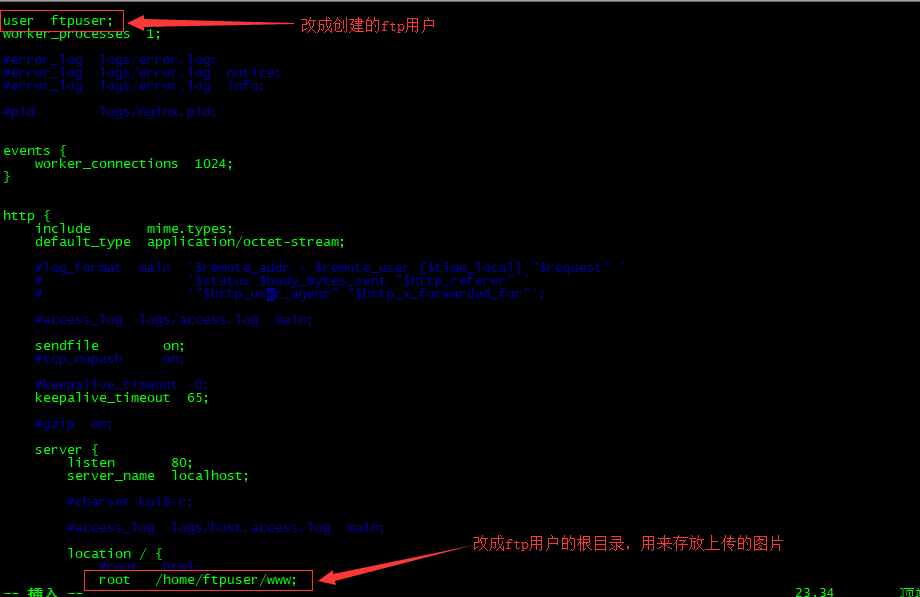
测试ftp服务 将Nginx作为项目图片服务器,需要配置nginx.conf文件:
1
2
3
4
5
6
7
8
9
10
11
12
13
14
15
16
17
18
19
20
21
22
23
24
25
26
27
28
29
30
31
32
package com.yangming.controller;import org.apache.commons.net.ftp.FTP;import org.apache.commons.net.ftp.FTPClient;import org.junit.Test;import java.io.File;import java.io.FileInputStream;import java.io.IOException;public class FtpTest { @Test public void testFTPClient () throws IOException { FTPClient ftpClient = new FTPClient (); ftpClient.connect("192.168.94.129" ,21 ); ftpClient.login("ftpuser" ,"ftpuser" ); FileInputStream inputStream = new FileInputStream (new File ( "C:\\Users\\Administor\\Pictures\\Saved Pictures\\timg.jpg" )); ftpClient.changeWorkingDirectory("/home/ftpuser/www/images" ); ftpClient.setFileType(FTP.BINARY_FILE_TYPE); ftpClient.storeFile("test.jpg" ,inputStream); ftpClient.logout(); } }
此时访问192.168.94.129/images/test.jpg就可以看到上传的图片了。